Showing posts with label Level Design. Show all posts

Monday, September 28, 2015

Aphrael Red FINAL!

Greetings and salutations! Today I will show all of you the completed work for Aphrael Red. Yay! First up is the final 3d art piece:


I think the character came out okay. She is my first truly completed 3D model for a game. I did all of the textures, modeling, rigging and animation for the character. I am certain there is some areas that need improvement but I am satisfied with the results at this point. Right now I even have her animated and playable somewhat in my game prototype Prism. However, before I get to that, I also wanted to show off the main props for Aphrael. First is the handgun.


This is Aphrael's handgun. The design was inspired from several sources, including a Baretta M9, a Varista from Phantasy Star Online, and a few other little things from various sources. In addition, I tried to keep the same motif of the weapon with Aphrael's sword to illustrate that the same manufacturer builds these weapons. I also wanted sharp, clean simplified lines with the overall aesthetic, giving it an authentic, yet futuristic look.

The textures themselves were interesting to build. I first made two texture maps, a diffuse map and an RGB mask. The RGB mask is used to tell Unreal what texture appears at what UV coordinate. After creating these, I made another RGB mask and diffuse map. These separate maps were used to tell Unreal where the decals on the handgun would be such as the text on the side of the barrel or the red safety mark by the safety switch.

Getting a good metal texture is one of the hardest things to do in 3D visual arts. However, after much practice, I have devised several ways in achieving different metals like the stainless steel and matte black metal of the body of the gun. Both use a tiling texture to create the base properties of the metal. This texture is not in the actual diffuse but is actually controlled by the roughness, or glossy output of the material. Both use a simple noise pattern, but how they are tiled and their specularity settings is what makes the difference. For the stainless steel, I have the noise pattern tiling in mainly one direction and in the other direction, squeezed to a point where it looks like fibers. For the black matte metal, the noise is processed through an inverse node so instead of being shiny and reflective, it is matte with some light reflected due to the density of the noise pattern, giving that metallic matte finish to the material. The overall shader is actually quite simple, but you have to know what you are doing to get these kind of results with as little work as possible.

Now the shader settings for the handgun were copied over for use with Aphrael's sword which you can see below:
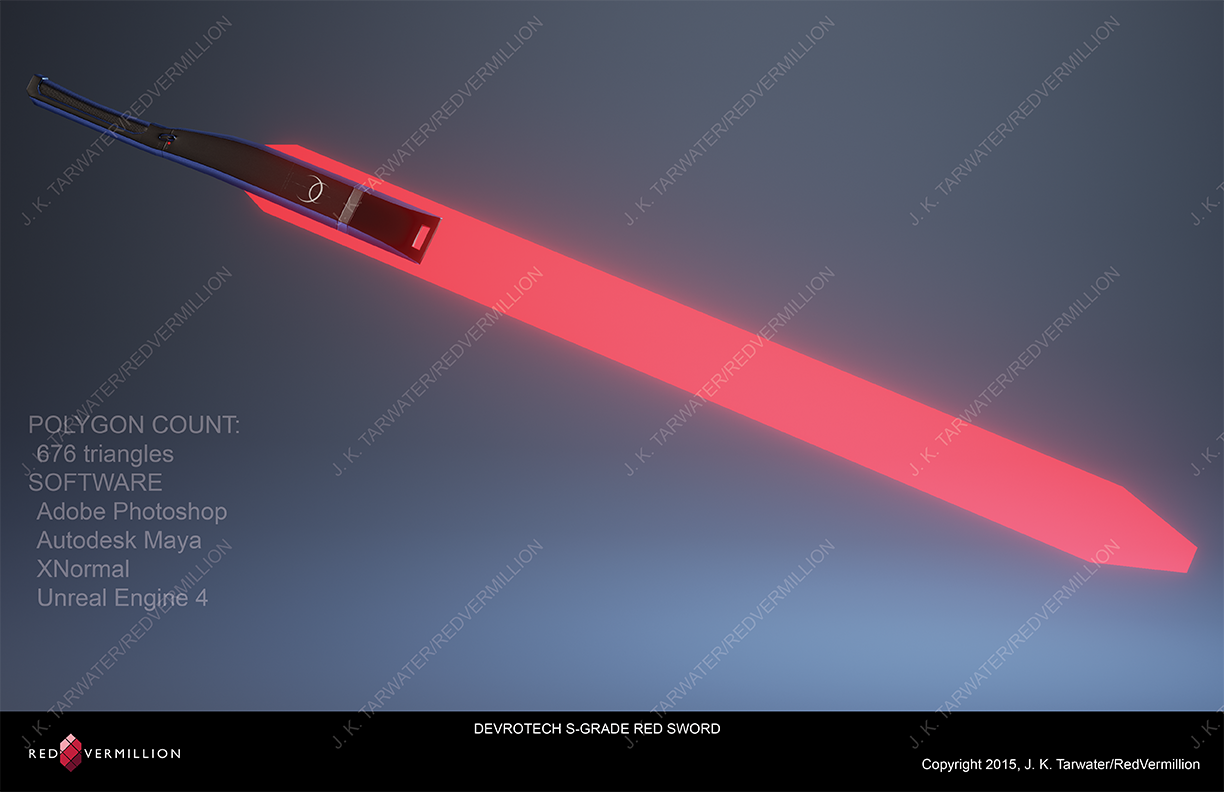

I used the same techniques here for the textures, RGB masks for the texture and decals layout, then two diffuse maps to define the color. Everything else is tiled and controlled by nodes in the material editor in Unreal. The blade itself is even simpler, using an emissive shader along with transparency to give the blade that energy-like feel since it is supposed to be an energy blade, not a solid one. The emissive part itself has a strength setting that I can tweak to control the strength of the glow. Also, note the design aesthetic of the hilt. Again, clean, minimalistic lines to give that futuristic feel. That is carried over onto the handgun and vice versa.

Now as I mentioned earlier, I have Aphrael in the early prototype of the game I am making, Prism. The last pictured I showed had trees and water, but not really much else. Here is a screenshot I rendered from Unreal of the changes to the level since last I posted about it:


Now it is starting to look more like a forest. The ferns were actually more of a hassle than anticipated to texture because of my usual method of creating textures. When I create plant textures, I usually look up several sources of photographs, chop them up into unrecognizable bits, repurpose them into a new image (a collage you can say) that looks good for a texture map of a plant, and apply that to the mesh. However, I could not find the references I needed to do this effectively for the ferns. Thus what I did is I closely studied the structure of the ferns and their leaves and then hand painted in Photoshop an individual leaf. I then copied and duplicated this into a larger texture with the stem of the leaf. Finally, I used this large leaf on an even larger texture with the actual branch, copying and pasting the smaller textures to create the whole main structure and placing it on a plane for the fern. Then in Maya, I copied this single mesh by using a duplicate tool in a 360 rotation several times and got the effect I was looking for, a functional looking fern. To ensure a little randomness to the mesh, I slightly rotated each tier of leaves slightly off center to give a more natural look.

The material of fern itself was simple enough. I created a normal map from a desaturated version of the diffuse texture in XNormal and then tweaked the specularity settings to get the appropriate shine of the leaves in the sunlight. Ferns have a slight sheen to them, so I wanted to try to capture that with the normal map and specularity settings. It gives the ferns a much needed sense of depth and three dimensionality. After that, changed the shader settings to a two-sided foliage and used a brighter version of the diffuse map for the subsurface lighting in the leaves. This really makes them seem more realistic, especially at a distance when sunlight is shining through the leaves of the trees.

One final thing I wanted to point out to was the texture for the water. In the game itself, the water moves using a simple panning node on two tiled normal maps combined with a depth fade. If you notice, the water is not as rough and turbulent as it was in my earlier post. One of the problems I had with the water is that it made the pond to stormy and choppy looking. The area doesn't have that much wind, just subtle breezes. In order to reflect this accurately in the water, I had to rework the normal maps. This didn't take long, especially since I use the same tiling texture for both normal maps. Its just that one of the textures is rotated 90 degrees in relation to the other. In addition, both textures use a slightly different panner node so they move at different speeds, giving the illusion of small waves on the surface of the water. Finally, a Fresnel plugged into the refractive output of the material is used in conjunction with those same normal maps to crate the reflections on the surface of the water.

So Aphrael herself is done at this point and the forest level is starting to really come into its own. I hope all of you enjoyed what you have seen and understand what I was explaining about the textures and how they were made. Next I may go into further detail about the rig that I used for Aphrael using Unreal Engine 4's wonderful Maya plugin, the Animation and Rigging Toolkit. This tool is a beast and it made building the rig and animation much easier and faster. I may go ahead and talk about this next so stay tuned!

Friday, July 10, 2015

Aphrael Red Update!

Greetings and salutations! Today I want to show two of the props I have developed for Aphrael. The first is a handgun that she will be able to pull out and use and the second is her primary weapon, a crimson energy sword. Here's what they look like:

Aphrael's pistol.

Aphrael's sword.
I am quite happy with how they are turning out. I am not done with them yet as you can see with the normal map artifacts on the pistol. I will need to paint those out with Photoshop.

The props aren't the only thing I have to show. I have updated some of the textures for Aphrael and I need a few more meshes to complete. In addition, I now have a rudimentary rig set up so I can test movement, camera location, and some controls as well.

Aphrael in the studio environment I built.

Aphrael in the actual level environment.
Ah yes, I forgot about the water. I created a new custom water material after watching a few tutorials online. It took a bit and I think it still needs work. It's just a pond so I need to tone down the waves a little bit since it's not that windy in the level. There's wind, but not enough to generate that much turbulence on the water's surface.

Another issue I am having and some people noticed this is that when the level is running, Aphrael seems a little out of place in the environment. What I mean that she doesn't seem to blend into the game. It's almost like she is rendering in front of blue screen, but more obvious. I don't know if that is because I am not done with the textures yet or not. I will have to look more into this. I'm also still struggling with the post-processing settings. I am not for certain how to adjust these or turn them off during actual game play. I need to do more research.

Anyway, I'll try to post more often, but my schedule is about to get really hairy. I am entering my final semester next week and I have only ten weeks left to get all of this done for the portfolio show. I also need to order business cards, get another character done, have the plans for the booth set up and ready to go, etc. It's about to get crazy so hopefully I can survive and finish!

Saturday, April 4, 2015

Prototype Prism Level WIP

Greetings and salutations! Today I want to show where I have progressed in Unreal Engine 4 in regards to Prism. It has been quite difficult, but very enjoyable to say the least. I have been working hours at a time in Unreal and forgetting to eat I've been having so much fun. I got to watch that, but it is so compelling to try to fix and experiment and tinker inside the engine, seeing what works and what doesn't. Anyway, last time I was talking about the level I had gotten the level tiles sculpted. Now they are UV mapped and have the appropriate textures ready for them. I also made a tree which I will show below.

My tree in Unreal Engine 4.
The tree itself took over four hours to build, including textures and UVs. It wasn't actually that hard, just long and tedious as I built the texture maps and the branch groups. Overall, the tree consists of 20,000 triangles which is actually probably too much. However, it is the best looking tree I have ever made and I am actually quite proud of it. Usually I am terrible at doing foliage but I am getting better. This tree is proof of that.

The textures on the ground mesh was a totally different story. They were frustrating me to no end. I could not get them to look sharp, clear and good no matter what I did. I tried UV mapping the ground plane and then painting the textures directly onto the mesh in Mudbox. However, that made the textures too large and blurry. So I tried baking procedurals in Maya but that came out even worse. Finally, I got this result:

Texture detail of the ground.
So how did I pull this off? By tiling! I discovered how to tile textures in Unreal by just using three nodes in the material editor. You see, the material editor is just like the Blueprints system and the Hypershade networks in Maya so setting it up was actually quite easy once I discovered how to do this. Tutorials helped of course, but I had to figure out how to actually get all of the information I learned together into a single shader network for this to work. Here is part of the network:

Shader network for the ground textures.
The two nodes TexCoord and Tiling determine how much the texture is tiled. These are multiplied together and plugged into the UV inputs of the texture files. The red and green texture to the left is an RGB mask. It drives where the textures show up on the mesh. Red is for soil and green is for grass. I then put everything together and plug them into the output mode of the material and voila! Instant success. Using one material to drive two textures saves on memory and render times. Unreal Engine 4 can have multiple layered textures, but according to the documentation, it can be quite expensive to have several materials layered in the same network. Thus why not use one material and drive the textures with an RGB mask? Quite ingenious if you ask me. I have a similar set up for the normal maps as well and I think it has come out very nice.

The last thing I am still working on is how to use the lighting engine in Unreal. Unreal uses something called Lightmass which handles its precomputed lighting. This was quite difficult to understand and I am still struggling with the best optimized use for it. When I first baked the light maps in this sample environment, I discovered that the normal maps on the tree were looking very odd, not at all like how it looked in Maya. After doing some research and re-baking the normal maps in xNormal, I discovered it wasn't the normal maps at all, it was Lightmass! It was baking my light maps at too low a resolution. So I upped the resolution and tweaked a few other things. The results speak for themselves:

Using Lightmass to bake the shadows and textures into the environment.
The textures you see on the tree is totally driven by a normal map. However, it only looks that good because I increased the resolution of the light map on the mesh for the tree. The same with the tree's shadow on the ground. It didn't look right until I did the same thing for the ground mesh as well. Then I added a small amount of GI to bring out the color in the shadows instead of having pitch black.

I'm really excited about my progress in Unreal Engine 4 so far. Just learning how the materials and lighting work together and individually will especially help me when I get Aphrael herself into the engine. I also can't wait to see what my finished prototype level will look like. It is going to be great!

Thursday, March 19, 2015

Level Tiles

Greetings and salutations. I apologize for the late post during the week. I didn't have anything to share and I still don't. Well, I can actually talk about how I am approaching level design in Prism.

For the levels in Prism, I am taking a modular approach. What I mean is that each level will be made up of specific rooms that function as the halls and intersections of a particular level. Within those tiles, I will have specific objects randomly spawn in preset locations. These objects could be enemies or they could be treasure. The reason for making the levels modular is because it saves time in the long run without compromising quality. The original Phantasy Star Online does it; Diablo, the game it's based off of, does it; and even Baldur's Gate: Dark Alliance does it. All three of those games pull off modular level design quite successfully so I will take the same approach, just hopefully with better graphics.

Now the first level I am working on is a forest level. Not a creepy forest level but a welcoming one, full daylight but under the shadows of ancient trees so the player has a chance to get familiar with the game in a mysterious, but not creepy, environment. Since it is the first level, I don't want many obstacles except for maybe simple enemies. I have already sculpted out the tiles which you can see below:

Tiles for Prism's forest level.
Each tile is fifty meters square, so they are good size. Unfortunately, because they are so large, they also have high polygon counts, each with 100,000 polygons. That is way too many polygons so I need to reduce them by quite a bit. I also need to create basic meshes for the flora and fauna. I have an idea for the lighting which I am thinking will be a yellow tone due to particles in the air like pollen and other stuff. Hence volumetric lighting or the illusion of it may be required. I will also need to see if Unreal Engine 4 supports cucoloris' so I can create the shadows of the trees on the ground. If not I can always bake them into the texture. Actually, it might be a better idea to just bake the shadows to save on render time for the game. Overall, I want the forest to seem old even though there is some technology within.

So this is what I have been working on all week. I will post more about the level in future posts, so stay tuned!